Quantcast
Channel: Blow Up – Exposure Software
Viewing all 48 articles
Browse latest View live

OS X Mavericks Updates

$
0
0

osx-mavericks-logo

If you installed OS X Mavericks and are having trouble with Exposure 5, Eye Candy 7, Blow Up 3, Snap Art 3, or Bokeh 2, please take a moment to install the latest version. There was a compatibility problem that required us to release updates.

Our older applications work well with Mavericks, with the exception of Exposure 4, which requires that you turn off App Nap to work correctly. There are instructions for doing this in our support article on the issue.


Sharpening Simplified

$
0
0

We’ve all used sharpening during post-processing before. It’s something as common as retouching red-eye or removing skin blemishes. Unfortunately, it’s commonly misunderstood. First, let’s get to know sharpening by answering a few basic questions.

What’s sharpening for?

Sharpening is a processing technique used to bring out detail and give your image presence. It’s primarily used to negate blurring effects that occur inside of the camera–usually caused by interpolation and the anti-aliasing filter.

How does it work?

Software detects transitions–edges–and amplifies the contrast to make them more pronounced. When applied correctly, sharpening will help your image pop. Above or beyond this amount is too much. If you can see the sharpening, it’s too much. Over sharpening is a common newbie photographer blunder. Be careful, and go easy on it.

SharpOversharp

Notice the brightened pixels in the oversharpened image.

Sharpening rule of thumb

Sharpen after you size your image for output, not before. If you are making a 24”x36” print, the sharpening amount will be radically different than if you’re posting a shot on Facebook. If you resize an image after sharpening, the tedious work you did to sharpen will get clobbered. First, size, then sharpen.

Photoshop Sharpening:

A lot of photographers use native tools in Photoshop to do their sharpening dirty work. Photoshop has a number of sharpening filters to choose from. They are clearly divided into two groups: generic and custom. Filters like Sharpen, Sharpen Edges, and Sharpen More are generic–meaning you don’t have any control over the sharpening they do.

The custom sharpening filters–Unsharp Mask and Smart Sharpen–give you adjustment parameters to customize the effect. Unsharp Mask applies sharpening in accordance to a threshold value set by the user. Smart Sharpen is similar, but it allows for you to designate what type of blur to remove such as Gaussian, Motion, or Lens. Gaussian blur is similar to a low-level softness introduced by camera sensors’ low-pass filter, so it’s the most common type.

Basic Sharpening Controls:

Let’s take a step further and talk about the sharpening settings, which are the Amount, Radius, and Threshold parameters.

Amount

This signifies the aggressiveness of the application, which is usually determined by a visual inspection. It’s recommended to confirm sharpening when viewing your image at a 2:1 or 1:1 ratio, depending on the output size. These magnification levels are more accurate because your computer isn’t randomly squashing pixels together. Make sure the math works out, first. When in doubt, use 1:1.

Magnification

See how the sharpening renders differently when viewed at different sizes?

Radius

This controls the distance (in pixels) surrounding a given pixel to which the sharpening is applied. There are two schools of thought when it comes to proper sharpening. One side uses a large radius, the other–small. Using a larger radius usually allows for a stronger amount of sharpening to be applied with good results. On the other hand, the smaller radius sharpening technique is more precise, which can keep artifacting at a minimum. In either case, be careful with sharpening, overly-aggressive sharpening can ruin a photo. I advise to err on the side of safety. Use just enough to make the image pop.

Radius

Threshold

This specifies a minimum amount of value difference between the center pixel and it’s surrounding pixels. A threshold value of 0 applies the sharpening to the entire image. The higher the value, the less of the sharpening you see. This is used to avoid sharpening smooth areas that may contain noise like sky.

Threshold

A heavy amount of sharpening was applied to this image for demonstration purposes.

These brief descriptions may sound like Greek, and that’s okay. Below are practical applications of these ideas in layman’s terms–mostly.

Lightness Sharpening:

Sharpening the Lightness channel is one of the most reliable sharpening procedures out there, but it’s a major pain in the butt with Photoshop alone. I use sharpening at output, meaning it’s one of the last steps in my image processing workflow. If I’m using Photoshop, I’ll have an image with dozens of layers, so my machine is running slow and, at times, it’s laggy. At this point I don’t want to perform a touchy adjustment like sharpening when it’s working like this.

Lightness

Easy solutions exist. I can: 1: Use Exposure’s sharpening, bypassing the Photoshop mode change work-around. 2: Use Blow Up to sharpen and resize my image for output in a single step. 3: Ignore the lagginess of my computer, and go through with the mode change procedure.

Easy Way #1 – Exposure:

Exposure performs 9 steps in Photoshop with one click. The Lightness Channel checkbox, on the Sharpening panel, designates the sharpening algorithm–similar to Photoshop’s Unsharp Mask–to apply to the lightness channel of your image. This makes sharpening adjustments only on the tonal values of the image, leaving the image’s colors alone. This produces crisp and clear sharpening.

Exposure

Easy Way #2 – Blow Up:

Blow Up is extremely easy to use. Just open your image and run Blow Up. Then, choose your output size from the presets. If you’d like more sharpening, you can add it with the handy sharpening sliders below, or again, use the presets. Click, click, boom–you’re done. The added value of Blow Up are the presets themselves. There are options that will automatically correct for blurring of different types, such as inks and paper types.

blowUp

Way #3 – Photoshop:

When sharpening in Photoshop, you may opt to use sharpening while in RGB mode, but I wouldn’t recommend it, especially if you’re not a Photoshop guru. However, if you’re not intimidated by techie step-by-step procedures, here’s how:

  1. Duplicate the image layer Cmd+J/Ctrl+J. If you’re using an image with multiple layers, use Cmd/Ctrl+Alt/Option+Shift+E (Duplicate visual and merge)

  2. Go to Image>Mode>LAB

  3. Don’t Flatten!

  4. Select the Channels Tab on the Layers Panel

  5. Select the Lightness Channel

  6. Run Unsharp Mask (Or whatever you’d like)

  7. Go to Image>Mode>RGB

  8. Don’t Flatten!

  9. Visually confirm sharpness is accurate

I prefer to forgo this procedure and use one of the other options above. If you aren’t happy with the sharpening, you have to trace back through these steps with better calibration.

In conclusion, we’ve talked a little about sharpening, what it is, what it does, how it behaves, and we’ve covered a couple of basic workflows. This topic is a gray area in terms of being a subjective topic. Although photographers, retouchers, and graphics gurus don’t see eye-to-eye on the perfect amount to apply, they all agree that too much is just too much.

You can use Exposure or Blow Up in demo mode. All of our products are fully functional during their trial period. Visit www.alienskin.com/downloads to grab the installers and try the products out for yourself.

Blow Up 3 About Box

$
0
0

We had an interesting time brainstorming for the Blow Up 3 about box. It started off with ideas involving explosions, bombs and fireballs. But this didn’t apply to Blow Up because this insinuates destruction. That and I was worried the FBI would start calling because my internet research was questionable.

If you look at the examples Blow Up does just the opposite of exploding, it keeps pixels from being destroyed. We needed something to match this idea. Here is what we came up with.

The first thing I did was took a balloon around the office to have everyone sign their names on it with a marker. I didn’t take into consideration the chemical reaction between a permanent marker and rubber. The balloon blistered and peeled itself apart after a few days. Darn, back to square 1. Plan “B” was to get the signatures on paper, scan it in, and use Photoshop to stretch it around the balloon. Luckily this worked great, I didn’t have a plan “C.”

For the shoot Adrianna used a ringlight with a diffuser. She used another light to fill in the backdrop behind the models. It turned out really well. She shared a bunch of the shots on her blog if you’d like to see more. Here are a few of them.

The post Blow Up 3 About Box appeared first on Alien Skin Software.

Photo Enlargement: The Great Resolution Hoax

$
0
0

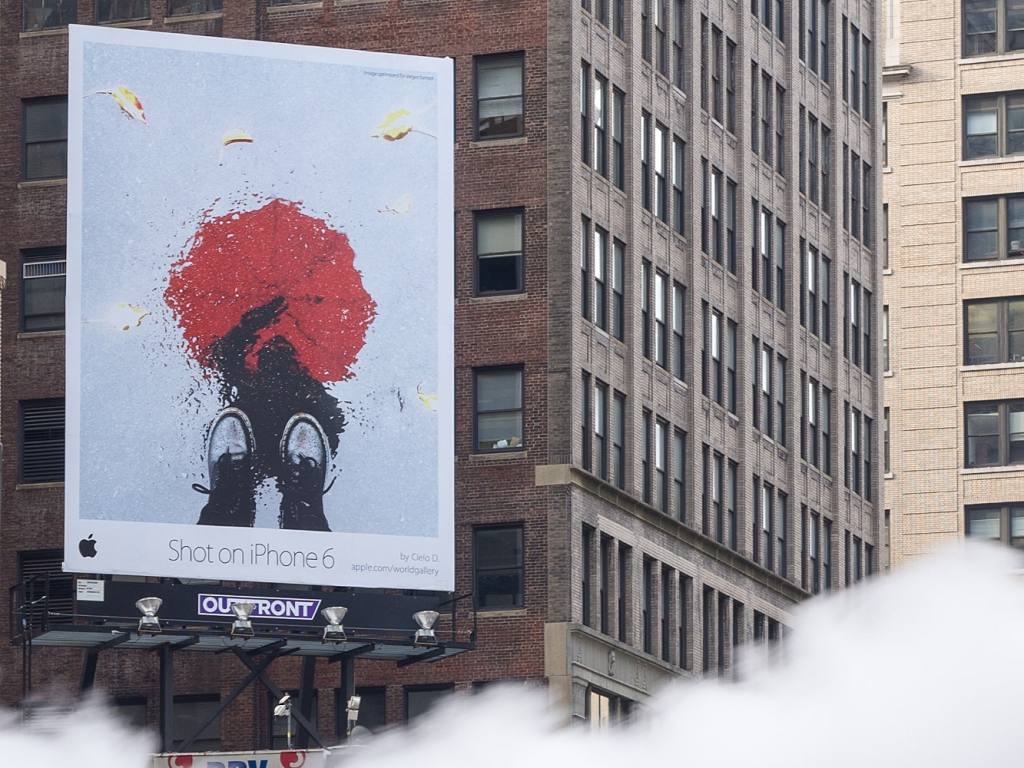
Upon emerging from Penn Station my gaze immediately focused on a fantastic billboard mounted to the side of a large building. Swarms of commuters hurried past as I took a few photos. Steam from the subway system swirled around me, but I stood motionless. It wasn’t the actual scene I was intrigued in, but the way the poster challenged how we think about photo enlargement and resolution.

photo enlargement: Chris_Corradino_Resolution_Hoax_Alien_Skin_01

From street level, determining the precise size of the ad was difficult. I’d guess it was 8 x 10 feet. Though in this case the actual dimensions didn’t really matter. Put simply, it far exceeded standard print sizes and still looked stunning. Now, if you’re anything like me and have done your research on cameras, sensors, and resolution, you may have expected this to be captured with a full frame DSLR and perhaps a professional quality lens. You would be wrong. In fact, it was shot on an eight megapixel iPhone 6.

photo enlargement: Chris_Corradino_Resolution_Hoax_billboard_Alien_Skin_02


Apple reviewed thousands of non-commissioned images before settling on the final 57 for display. They were processed with the typical array of photo editing apps and printed to billboard size. Now, some of you may be thinking, “yeah but it’s an Apple ad so they had access to the best photo enlargement software, interpolation tools, etc.” You’d be correct as the ad actually says “image optimized for larger format” in the upper right corner. Here’s the thing; you have the ability to do this as well. For starters, the bicubic smoothing option in Photoshop does an acceptable job at reducing jaggies. For even more control, Alien Skin’s photo enlargement tool Blow Up resamples while keeping details remarkably sharp.

photo enlargement: Chris_Corradino_Resolution_Hoax_subway_poster_Alien_Skin

What does this mean? You can remove the next camera body from your shopping cart and make massive prints with the model you own right now. I find that incredibly empowering. That 10 megapixel DSLR from 2008? It’ll do just fine. So will the 16 megapixel micro 4/3 body or the Sony with compressed Raw files. The key is to capture a technically sound image in the camera at the time of exposure. This quality file will hold up better to more post production in photo enlargement software and super sized prints. Of course good light also helps, but perhaps the biggest impact comes from the quality of the lens.

photo enlargement: Chris_Corradino_Resolution_Hoax_BlowUp_Alien_Skin

photo enlargement: Chris_Corradino_Resolution_Hoax_BlowUp_Alien_Skin

Please don’t get me wrong, I am in no way advocating a massive DSLR fire sale. The artistic control of a manual camera is undoubtedly far more powerful than any point and shoot or phone. What I am noting however, is that all of the megapixel talk, sensor comparisons and new camera reviews are designed to sell more merchandise, not make you a better artist.

photo enlargement: Chris_Corradino_Resolution_Hoax_6_megapixel_Alien_Skin

I can see the heated comments now; “more megapixels give me more cropping space.” Sure, but why this sudden need to crop so heavily? For example, Henri Cartier-Bresson didn’t crop at all. Instead, he only included what he wanted in the viewfinder. His results speak for themselves.

photo enlargement: Chris_Corradino_Resolution_Hoax_7_bresson_quote_Alien_Skin

In checking the submission requirements for Getty images, you’ll notice that files need to be 50MB. Even on most full frame camera, resampling in photo enlargement software is necessary to accomplish this. Yet despite the interpolation, these images are of high enough quality for the world’s largest stock photography agency and all of their clients. Still think you need more resolution? Look at the list of approved cameras for Getty. You’ll see older models such as the 10 megapixel Canon 40D.

photo enlargement: Chris_Corradino_Resolution_Hoax_eye_of_the_bridge_alien_Skin

What I really saw in that billboard was more than just an ad for the latest smart phone. It was a sign that we’ve allowed the promise of the next best thing to cloud our vision for far too long. This has been perpetuated by marketing campaigns, forum chatter and magazine advertorials. As camera sales continue to decline, this noise will only grow louder to drum up new business. When it does, think back to this large billboard created with a camera phone. There may be no end in sight for the megapixel race, but it doesn’t mean you have to run in it to succeed. A wise man once said, “if you win the rat race, you’re still a rat”. I’d rather be a photographer.

photo enlargement: Chris_Corradino_Resolution_Hoax_Alien_Skin_mirror

The post Photo Enlargement: The Great Resolution Hoax appeared first on Alien Skin Software.

Creative Cloud 2015 Compatibility

$
0
0

Adobe_Creative_Cloud_icon_RGB_256px

Another day, another batch of Creative Cloud updates. I’m happy to announce that Alien Skin products install and run just fine in Photoshop CC 2015 and Lightroom CC 2015.

For Photoshop users, there is one complication. If you updated from an older version of Photoshop CC, the updater doesn’t bring over your plug-ins to the new version. To fix this, just download and run the latest installers from our downloads page.

The post Creative Cloud 2015 Compatibility appeared first on Alien Skin Software.

OS X El Capitan Compatibility

The Exposure X Bundle Touches Down April 19th!

$
0
0

It’s been a few months since we released Exposure X, the standalone editor that also works as a Photoshop and Lightroom plugin. Since then, we’ve been busying our translucent alien fingers with putting the finishing touches on an update to our complete photo editor, the Photo Bundle. Starting on April 19th, it will be known as the Exposure X Bundle.

As you might have guessed, Exposure X is its centerpiece. We’ve integrated Exposure X with our other photo editing apps: Snap Art 4 and Blow Up 3. This bundle introduces a closer level of integration between Exposure X and these apps — for the first time, they can be launched directly from within Exposure X. And the bundle includes the latest version of Exposure X (version X.1), which brings new features like multi-monitor support, batch-file renaming, improved performance, and a brush mask for more precise editing. As always, each app can also be launched as a Photoshop or Lightroom plugin.

And there are savings, lots of savings.

The Exposure X Bundle is almost 60% less expensive than buying each app separately. For those of you who already own Exposure X, Snap Art 4, or Blow Up 3, you save an additional 40% on the bundle price. And if you bought the previous Photo Bundle after December 8th (the Exposure X release date), then the Exposure X Bundle is a free upgrade for you.


Standalone or Photshop and Lightroom plugin © Andrea Livieri - Fall colors photo processed with Exposure X Bundle complete photo editor

© Andrea Livieri

In case you aren’t familiar with the previous Photo Bundle, or with each of the three apps, here’s a quick rundown on each:

  • Exposure X non-destructive editing and organizing tools make it easy for you create beautiful images and manage your photo library. A few standout features are:
    • Hundreds of evocative film styles as starting points for developing your own style
    • Robust editing tools to refine your images
    • A streamlined workflow that eliminates fussy, time-consuming tasks like importing images and managing catalogs
    • Extensive organizational tools to help you manage your photos
    • A UI that’s customizable and intuitive
  • Snap Art natural media tools enable you to easily transform your photos into gorgeous, handcrafted paintings that look like they were created using oil paints, watercolors, etc.
  • Blow Up image enlargement technology makes it easy for you to enlarge your photos while keeping them crystal clear.

With these tools at your fingertips, you have a complete photo editor that enables you to create captivating images in a variety of styles. You can also move quickly through your workflow, so that you can get back to shooting.

If you’re shooting professionally, you can deliver more value to your clients with these cool styles and treatments. See here for an awesome case study.  If you’re shooting for your family or for yourself, you can bring an unexpected look to portraits, landscapes, and any other style that you shoot.

Visit the product page for each app if you’d like to learn more: Exposure X, Snap Art 4, Blow Up 3.

The Exposure X Bundle mothership lands on April 19th, so watch the skies!

The post The Exposure X Bundle Touches Down April 19th! appeared first on Alien Skin Software.

Using Blow Up Image Enlargement to Deliver Large Prints to Clients

$
0
0

Alien Skin’s Blow Up image enlargement software enables photographers to easily create large prints that look great at huge sizes. We recently spoke with Raleigh, NC photographer Simon Griffiths, who uses Blow Up to provide local restaurants, hotels, and other retail spaces with high-quality large prints. He spoke with us about the image enlargement process, how to manage client expectations, and about the potential hazards of creating work that’s good enough to steal.

How long have you been using Blow Up for image enlargement, and why did you begin using it?

I’ve been using Blow Up for 10 years now. I had been using a series of actions prior to using Blow Up that worked okay but were cumbersome and took awhile to process. In Blow Up, having the interface that gives me an idea of what the finished image will look like at 100% is a real plus.

I first started using Blow Up when camera file sizes were maxing out at the 10-12 Megapixal range. My first commercial use was in the enlarging of files of that size up to 6 feet wide. I then took composite images up to as much as 10 feet wide, printed on stretched canvas.

For my show a year and a half ago, I created 12 large fine art prints that were enlarged primarily from 32 megapixel files up to 40 inches in one dimension. The quality of enlargement was outstanding and in many cases looked like the images had been shot on large format film or digital.

I just finished a project for a client that required taking their small JPGs at 72dpi up to 18”x24” at 300dpi. I used Blow Up on all the images and the results were extraordinary.

I did some initial editing in Photoshop to bring out clarity and contrast and improve the look of images that were either old JPGs of prints, or just small digital files. I then imported the images into Blow Up and took them all up to the same size. The grain function of Blow Up allowed me to bring a more historic look to several images, which was the point of the project anyway. The client was ecstatic.

Can you walk us through the image enlargement process with a sample image?

image enlargement by simon griffiths using alien skin blowup

This was originally shot on a Nikon D200, which is a 12 megapixal camera. It was blown up to a layered image that is 1.8Gigs, so it’s six images stitched together. Then I used Blow Up to get it to a 60” wide print at 300dpi.

Even with the increased file size of the Nikon D800, I still use Blow Up when making larger prints, especially when the files I’m provided with aren’t that large to begin with.

A lot of my older work is on film and I can scan it at fairly high resolution using my Imacon scanner, but even then if I need to make a large print, I’ll use Blow Up to get it to the size I need with a DPI that tends to work better with my printer.

What was the learning curve like?

It’s fairly intuitive, so I can’t see that the learning curve is that hard.

If you use Blow Up as part of the Exposure Bundle, where does Blow Up occur in your workflow?

I only use Blow Up on a copy of my final image. Once I have made all my adjustments either with Exposure and Photoshop, I will save the file and then use Blow Up within Photoshop to enlarge the copy to whatever size is required, leaving the original file alone.

When you know you are going to enlarge an image in Blow Up, does it influence how you edit it ?

I don’t use as much sharpening on my original if I know it’s going to be enlarged greatly. I will wait for that step until either during the Blow Up process using the tools within Blow Up, or afterward in Photoshop. I like the fact that I can play with the before/after view to see what the effect will be within Blow Up. I also like to do that in Photoshop using a separate layer, after which I can go back to see which one works better.

What advice can you give photographers wanting to upsell existing clients or find new clients for large prints? How have you found your clients for these?

When asked to possibly make enlargements for clients, I will always photograph the space. Measure it correctly, then give them composite photographs with examples of what the images will look like on the walls to scale. It really helps sell the idea of large works of art. I used perspective, distort, and transform functions within Photoshop to correctly scale the images to the space where the image will hang.

blowup_dsc1160_dsc1160resized

For any photographers who are new to image framing, what considerations should they be aware of? What do you look for when choosing a frame?

Although I’ve offered unframed canvas prints in the past, I frame almost everything now. Unframed canvas has to be absolutely perfect to come across as something better than you can get at Costco. Very few companies can provide a level of canvas wrap that is really clean and professional looking.

If you want clients to pay you a lot of money, then if they look at the materials used on the back of a canvas wrap, it can completely undermine your ability to charge a premium.

All my wraps are custom built with heavy duty bars. The wrapping has to be absolutely perfect and for a long time, I had a guy that was so good at it. His wrapping was a work of art. I either use black edges or create a white border on the face of the wrap. Now because I struggle to get the back of the canvas as clean as I would like, I almost always custom build a floating frame to wrap the image. It looks so much more professional. I prefer to offer framed prints as finished pieces for my clients. It allows them to see my vision in its final form.

simon-griffith-bu

Do you use Blow Up exclusively for commercial work to clients, or do you also use it for image enlargement work for family and friends?

I don’t distinguish my work separately, whether it is for me or my clients. I am a BIG believer in personal work. Much of my work is personal. It drives my creativity and as such drives the kind of work I get from clients. If your portfolio is based on the work you did for clients yesterday and last week, then the work you get tomorrow and next week will likely be the same or less creative. If you show work in your portfolio that is creative and personal, then it starts to drive your work that you get tomorrow and next week.

raleigh

Your Blow Up image enlargement work of ACC basketball players was stolen right off the walls of a hotel. Did the police ever recover these?

No, they didn’t recover the prints that I know of. I’m not sure the hotel even pursued it. The prints are probably sitting in some frat house. Since the hotel bought the work outright, it was insured, so we just redid them.
 

To see more of Simon’s work, visit his website.

The post Using Blow Up Image Enlargement to Deliver Large Prints to Clients appeared first on Alien Skin Software.

Crystal Clear Photo Resizing for Creating Artwork

$
0
0

Brian Edward Miller is a digital illustrator at Orlin Culture Shop based in Erie, Colorado. His design goal is to provide quality illustration and storytelling with a vintage aesthetic. One interesting thing about Brian is how he uses Blow Up for his larger artworks, such as illustrative wraps for the Natural History Museum of Los Angeles County and huge posters for Wings Over Washington.

photo resizing with Blow Up

Blow Up enabled Brian to design the Earthmobile’s semi-truck wrap for the Natural History Museum of Los Angeles County. Below are tight crops to show the detail.


Why does an illustrator need Blow Up’s photo resizing technology?

Brian’s production process involves a significant amount of Photoshop, as you could imagine. He does use a fast computer that’s capable of working with 1-2 GB files, but even that machine quickly becomes overloaded. A laggy computer is too cumbersome when working on huge files for large-scale images. Brian says, At that size, a single brush stroke can take seconds to render out, which completely destroys my workflow.

Blow Up solves this issue. Rather than suffering through lag, he uses a smaller, more manageable file size while creating the artwork. Then, he will use Blow Up to enlarge the piece after it’s been flattened. For Brian, Blow Up isn’t just making the final piece look good, it actually frees me up to work at the speed I need to during the painting process.

The Seamobile was the second semi-truck trailer Brian designed for the Natural History Museum of Los Angeles County. Below are a few close crops to show detail.


Why did Brian choose Blow Up for resizing?

Brian describes his introduction to Blow Up: We ran quality tests on my pieces — which have lots of texture, noise, and detail — when I first tried using Blow Up. I compared it against several other resizing applications, but Blow Up was the clear-cut winner. We went as far as to print a few pieces with a large format printer for a proper side-by-side comparison. Blow Up maintained the quality of my textures without making them fuzzy or distorted. The rendering quality and the affordable price of Blow Up made it the obvious choice for all my resizing needs.

Some of the illustrations I’ve done had to fit on a semi-truck wraps, so the pieces get pretty big! The agency I worked with turned me onto Blow Up. We realized with a few tests that we could enlarge my artwork up 700% before we started to see any sort of quality fall off.

One useful workflow trick I’ve found is to use it at the start of a project on a blank canvas, just to double check my size ratios. That way I know the exact percentage I’ll be enlarging things to.

Blow Up was integral to Brian’s process in making this 7-foot tall poster for Wings over Washington. A detailed crop is just below.

Blow Up has enabled me to work at a much faster pace without having to worry that the quality of the final print will suffer.

Learn more about Brian Edward Miller and see more of his fantastic illustrations on his website, Instagram, or Twitter. Additionally, learn about the artworks mentioned in this article on Brian’s blog.

If you haven’t used Blow Up before, download the free 30-day trial.

The post Crystal Clear Photo Resizing for Creating Artwork appeared first on Alien Skin Software.


Handy Shortcut Keys

$
0
0

Most people don’t read software manuals, which means that invisible features are usually missed. By invisible I mean part of the user interface that you can’t see, like shortcut keys. Let me share a few of my favorite shortcut keys with you. These apply to almost all of our products.

Don’t be afraid to experiment. We have unlimited undo/redo with Command-Z/Y (Mac) or Control-Z/Y (Windows). Just undo to get back to a good state. To get back to the factory defaults, hit Command-R (Mac) or F5 (Windows).

Hold the spacebar to see your image without our effects applied. I frequently hit spacebar to see how much I am changing my image. Another handy use (in Photoshop too) is to hold spacebar to temporarily switch to the Hand Tool while you are in the Zoom Tool.

All of our preview navigation buttons are the same as Photoshop. If you know shortcuts in Photoshop to zoom in, zoom out, zoom to 100%, fit to window, etc then you know how to do it in our products.

Many of our products have long lists of presets. Instead of clicking with the mouse, you can use the up and down arrow keys to move up and down the preset list. The left and right arrow keys will open and close folders. In Exposure 3 and Bokeh 2 the comma and period keys are the same as the up and down arrows, but they also automatically open the next folder when you get to it.

You can find a list of shortcut keys in the manuals for our products. Manuals are found in the Help menu (? button in newer products) or by hitting F1 on Windows or Command+/ on Macintosh.

The post Handy Shortcut Keys appeared first on Alien Skin Software.

64-bit Updates Done!

$
0
0

We just released updates for Blow Up 2, Snap Art 2, Image Doctor 2, and Xenofex 2. All currently shipping Alien Skin products are now 64-bit compatible on both Mac OS X and Windows!

You can download the latest installers from our downloads page.

On Mac OS X, the updates only support the Intel platform, so PowerPC users should not update.

The post 64-bit Updates Done! appeared first on Alien Skin Software.

Blow Up 3 About Box

$
0
0

We had an interesting time brainstorming for the Blow Up 3 about box. It started off with ideas involving explosions, bombs and fireballs. But this didn’t apply to Blow Up because this insinuates destruction. That and I was worried the FBI would start calling because my internet research was questionable.

If you look at the examples Blow Up does just the opposite of exploding, it keeps pixels from being destroyed. We needed something to match this idea. Here is what we came up with.

The first thing I did was took a balloon around the office to have everyone sign their names on it with a marker. I didn’t take into consideration the chemical reaction between a permanent marker and rubber. The balloon blistered and peeled itself apart after a few days. Darn, back to square 1. Plan “B” was to get the signatures on paper, scan it in, and use Photoshop to stretch it around the balloon. Luckily this worked great, I didn’t have a plan “C.”

For the shoot Adrianna used a ringlight with a diffuser. She used another light to fill in the backdrop behind the models. It turned out really well. She shared a bunch of the shots on her blog if you’d like to see more. Here are a few of them.

The post Blow Up 3 About Box appeared first on Alien Skin Software.

Photo Enlargement: The Great Resolution Hoax

$
0
0

Upon emerging from Penn Station my gaze immediately focused on a fantastic billboard mounted to the side of a large building. Swarms of commuters hurried past as I took a few photos. Steam from the subway system swirled around me, but I stood motionless. It wasn’t the actual scene I was intrigued in, but the way the poster challenged how we think about photo enlargement and resolution.

photo enlargement: Chris_Corradino_Resolution_Hoax_Alien_Skin_01

From street level, determining the precise size of the ad was difficult. I’d guess it was 8 x 10 feet. Though in this case the actual dimensions didn’t really matter. Put simply, it far exceeded standard print sizes and still looked stunning. Now, if you’re anything like me and have done your research on cameras, sensors, and resolution, you may have expected this to be captured with a full frame DSLR and perhaps a professional quality lens. You would be wrong. In fact, it was shot on an eight megapixel iPhone 6.

photo enlargement: Chris_Corradino_Resolution_Hoax_billboard_Alien_Skin_02


Apple reviewed thousands of non-commissioned images before settling on the final 57 for display. They were processed with the typical array of photo editing apps and printed to billboard size. Now, some of you may be thinking, “yeah but it’s an Apple ad so they had access to the best photo enlargement software, interpolation tools, etc.” You’d be correct as the ad actually says “image optimized for larger format” in the upper right corner. Here’s the thing; you have the ability to do this as well. For starters, the bicubic smoothing option in Photoshop does an acceptable job at reducing jaggies. For even more control, Alien Skin’s photo enlargement tool Blow Up resamples while keeping details remarkably sharp.

photo enlargement: Chris_Corradino_Resolution_Hoax_subway_poster_Alien_Skin

What does this mean? You can remove the next camera body from your shopping cart and make massive prints with the model you own right now. I find that incredibly empowering. That 10 megapixel DSLR from 2008? It’ll do just fine. So will the 16 megapixel micro 4/3 body or the Sony with compressed Raw files. The key is to capture a technically sound image in the camera at the time of exposure. This quality file will hold up better to more post production in photo enlargement software and super sized prints. Of course good light also helps, but perhaps the biggest impact comes from the quality of the lens.

photo enlargement: Chris_Corradino_Resolution_Hoax_BlowUp_Alien_Skin

photo enlargement: Chris_Corradino_Resolution_Hoax_BlowUp_Alien_Skin

Please don’t get me wrong, I am in no way advocating a massive DSLR fire sale. The artistic control of a manual camera is undoubtedly far more powerful than any point and shoot or phone. What I am noting however, is that all of the megapixel talk, sensor comparisons and new camera reviews are designed to sell more merchandise, not make you a better artist.

photo enlargement: Chris_Corradino_Resolution_Hoax_6_megapixel_Alien_Skin

I can see the heated comments now; “more megapixels give me more cropping space.” Sure, but why this sudden need to crop so heavily? For example, Henri Cartier-Bresson didn’t crop at all. Instead, he only included what he wanted in the viewfinder. His results speak for themselves.

photo enlargement: Chris_Corradino_Resolution_Hoax_7_bresson_quote_Alien_Skin

In checking the submission requirements for Getty images, you’ll notice that files need to be 50MB. Even on most full frame camera, resampling in photo enlargement software is necessary to accomplish this. Yet despite the interpolation, these images are of high enough quality for the world’s largest stock photography agency and all of their clients. Still think you need more resolution? Look at the list of approved cameras for Getty. You’ll see older models such as the 10 megapixel Canon 40D.

photo enlargement: Chris_Corradino_Resolution_Hoax_eye_of_the_bridge_alien_Skin

What I really saw in that billboard was more than just an ad for the latest smart phone. It was a sign that we’ve allowed the promise of the next best thing to cloud our vision for far too long. This has been perpetuated by marketing campaigns, forum chatter and magazine advertorials. As camera sales continue to decline, this noise will only grow louder to drum up new business. When it does, think back to this large billboard created with a camera phone. There may be no end in sight for the megapixel race, but it doesn’t mean you have to run in it to succeed. A wise man once said, “if you win the rat race, you’re still a rat”. I’d rather be a photographer.

photo enlargement: Chris_Corradino_Resolution_Hoax_Alien_Skin_mirror

The post Photo Enlargement: The Great Resolution Hoax appeared first on Alien Skin Software.

The Exposure X Bundle Touches Down April 19th!

$
0
0

It’s been a few months since we released Exposure X, the standalone editor that also works as a Photoshop and Lightroom plugin. Since then, we’ve been busying our translucent alien fingers with putting the finishing touches on an update to our complete photo editor, the Photo Bundle. Starting on April 19th, it will be known as the Exposure X Bundle.

As you might have guessed, Exposure X is its centerpiece. We’ve integrated Exposure X with our other photo editing apps: Snap Art 4 and Blow Up 3. This bundle introduces a closer level of integration between Exposure X and these apps — for the first time, they can be launched directly from within Exposure X. And the bundle includes the latest version of Exposure X (version X.1), which brings new features like multi-monitor support, batch-file renaming, improved performance, and a brush mask for more precise editing. As always, each app can also be launched as a Photoshop or Lightroom plugin.

And there are savings, lots of savings.

The Exposure X Bundle is almost 60% less expensive than buying each app separately. For those of you who already own Exposure X, Snap Art 4, or Blow Up 3, you save an additional 40% on the bundle price. And if you bought the previous Photo Bundle after December 8th (the Exposure X release date), then the Exposure X Bundle is a free upgrade for you.


Standalone or Photshop and Lightroom plugin © Andrea Livieri - Fall colors photo processed with Exposure X Bundle complete photo editor

© Andrea Livieri

In case you aren’t familiar with the previous Photo Bundle, or with each of the three apps, here’s a quick rundown on each:

  • Exposure X non-destructive editing and organizing tools make it easy for you create beautiful images and manage your photo library. A few standout features are:
    • Hundreds of evocative film styles as starting points for developing your own style
    • Robust editing tools to refine your images
    • A streamlined workflow that eliminates fussy, time-consuming tasks like importing images and managing catalogs
    • Extensive organizational tools to help you manage your photos
    • A UI that’s customizable and intuitive
  • Snap Art natural media tools enable you to easily transform your photos into gorgeous, handcrafted paintings that look like they were created using oil paints, watercolors, etc.
  • Blow Up image enlargement technology makes it easy for you to enlarge your photos while keeping them crystal clear.

With these tools at your fingertips, you have a complete photo editor that enables you to create captivating images in a variety of styles. You can also move quickly through your workflow, so that you can get back to shooting.

If you’re shooting professionally, you can deliver more value to your clients with these cool styles and treatments. See here for an awesome case study.  If you’re shooting for your family or for yourself, you can bring an unexpected look to portraits, landscapes, and any other style that you shoot.

Visit the product page for each app if you’d like to learn more: Exposure X, Snap Art 4, Blow Up 3.

The Exposure X Bundle mothership lands on April 19th, so watch the skies!

The post The Exposure X Bundle Touches Down April 19th! appeared first on Alien Skin Software.

Viewing all 48 articles
Browse latest View live


Latest Images